
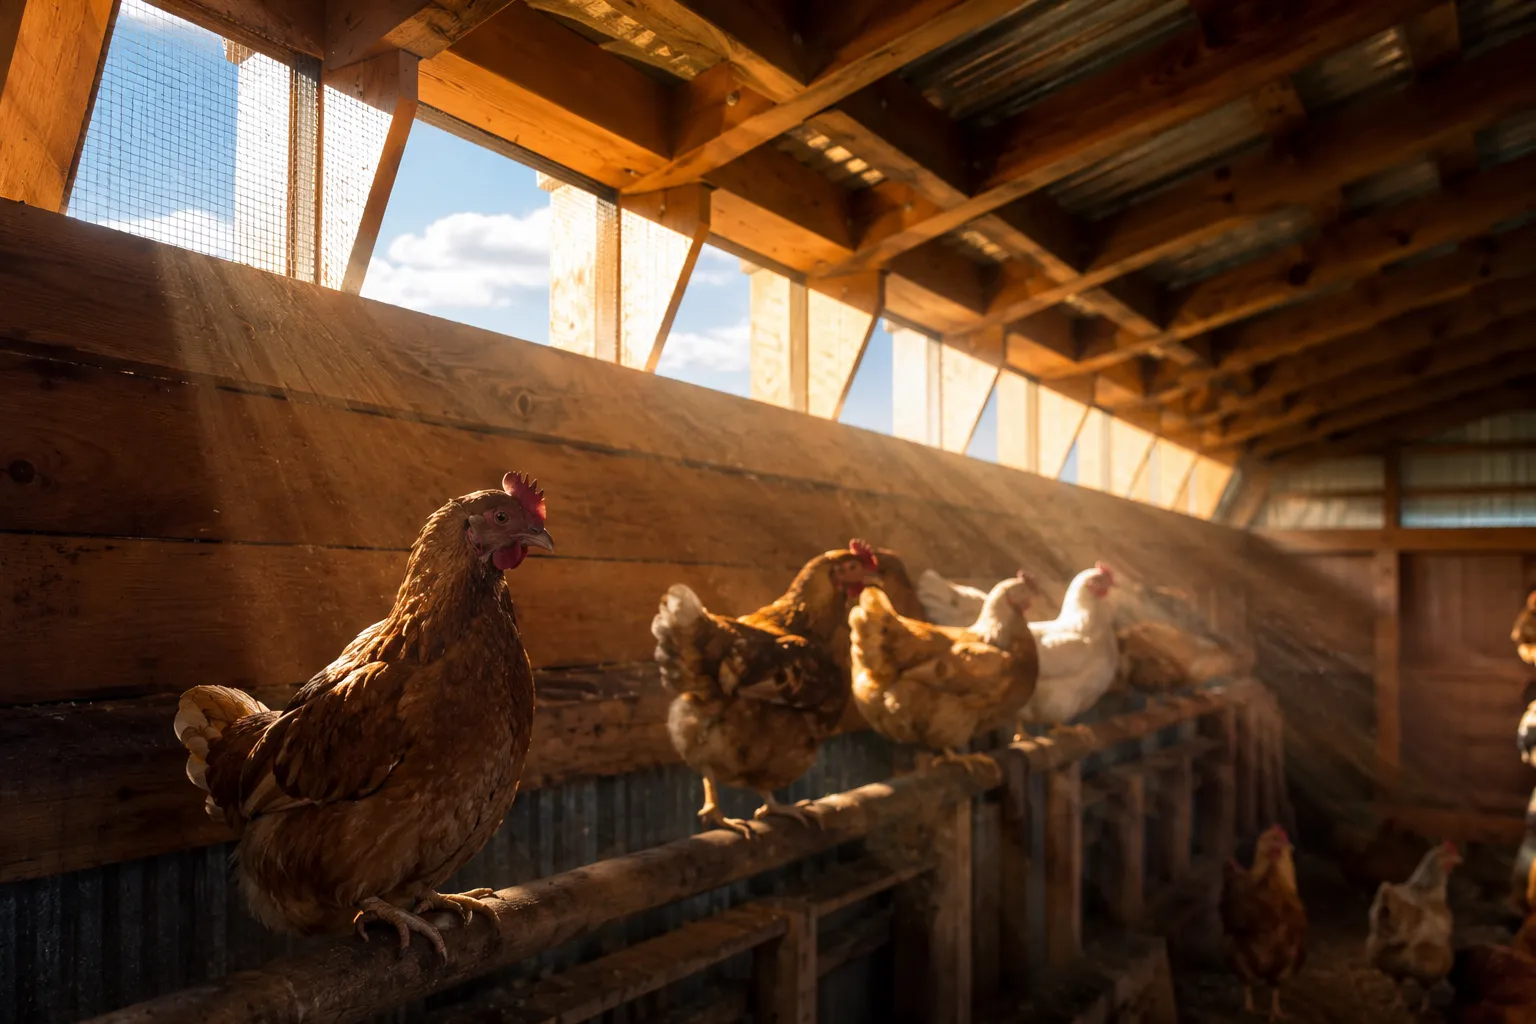
Quick Answer: Ventilation is controlled airflow placed high in a chicken coop that removes moisture and ammonia without blowing directly on birds, while drafts are unwanted cold air currents at chicken level that chill birds and cause health problems. Good ventilation keeps chickens healthy; drafts make them sick. The key difference is placement and control: ventilation openings belong near the roof, drafts come from gaps at or below roost height.
Key Takeaways
- Ventilation removes harmful moisture and ammonia from coop air through high openings near the roof that don’t blow on roosting chickens
- Drafts are cold air currents at chicken level that come from cracks, gaps, or low openings and directly chill birds, especially at night
- All coops need year-round ventilation, even in winter, but never need drafts
- Proper ventilation placement is above roost height (at least 12 inches higher than where chickens sleep)
- Signs of poor ventilation include condensation on walls, ammonia smell, respiratory issues, and frostbitten combs in winter
- One square foot of ventilation per 10 square feet of floor space is a good starting guideline for most climates
- You can add ventilation without creating drafts by placing openings high and using adjustable covers for control
- Drafts cause stress, illness, and reduced egg production while ventilation prevents these same problems
- Winter ventilation is critical because closed coops trap moisture from chicken respiration, leading to frostbite and respiratory disease
- Different climates need adjusted ventilation strategies but the core principle (high openings, no low drafts) remains constant
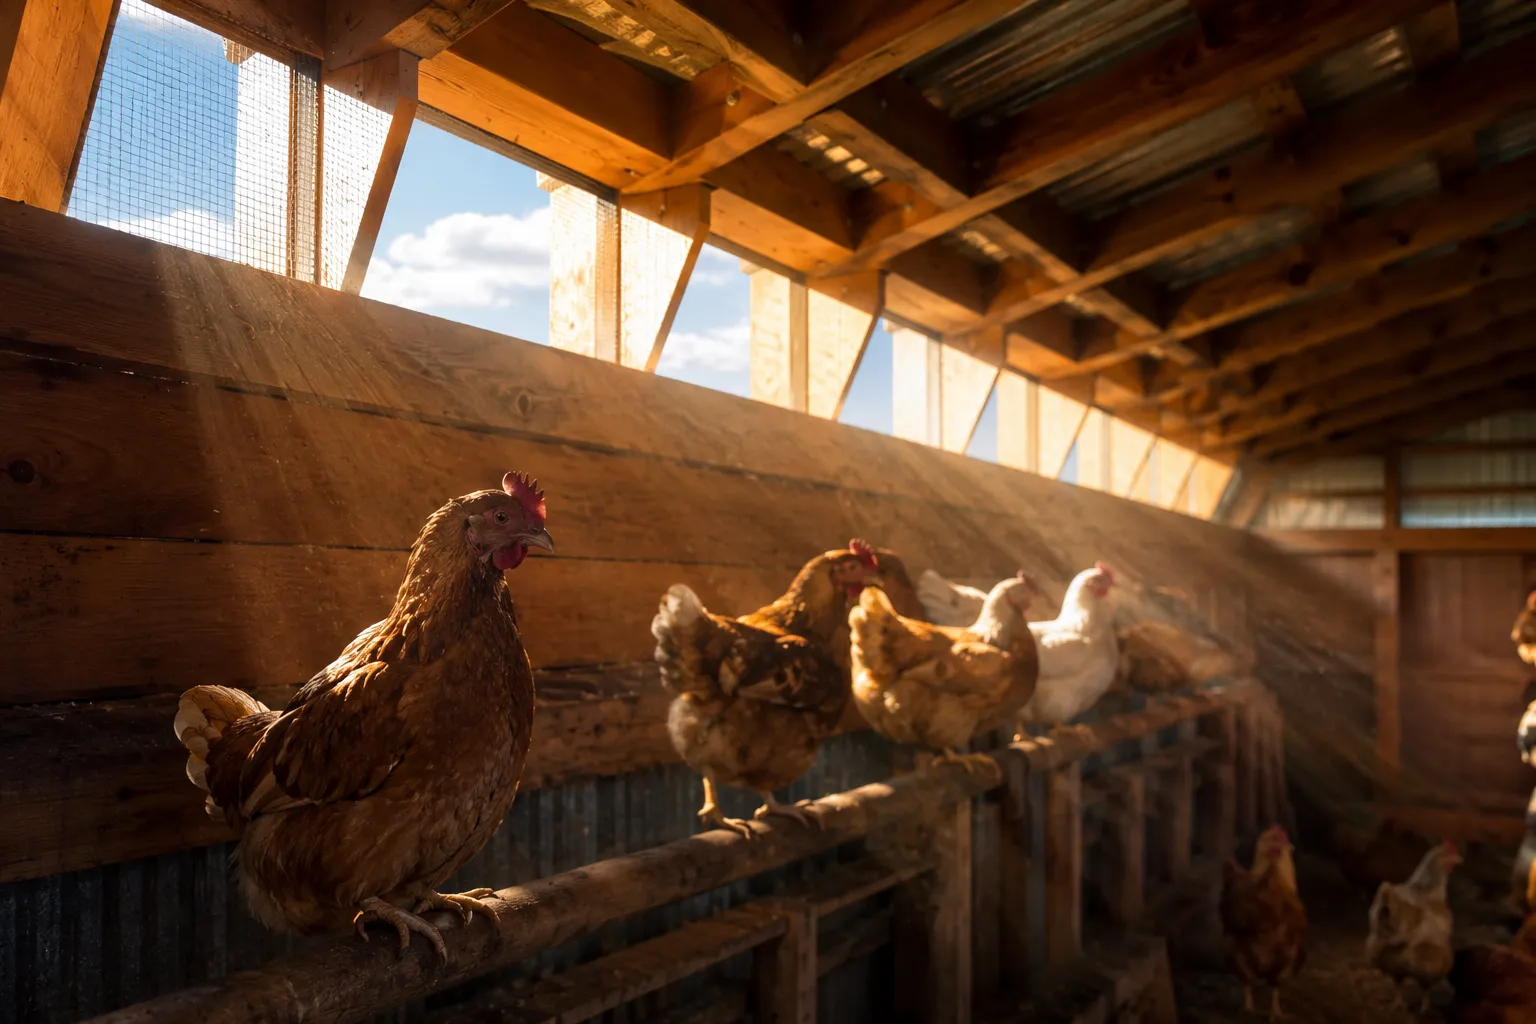
What Is the Difference Between Ventilation and Drafts in a Chicken Coop?
Ventilation is intentional, controlled airflow that enters and exits through planned openings positioned above where chickens roost, allowing fresh air to circulate while stale air, moisture, and ammonia escape. Drafts are uncontrolled air currents that blow directly on chickens, typically entering through cracks, gaps, or poorly placed openings at or below roost level.
The critical distinction comes down to three factors:
Placement: Ventilation openings sit high in the coop (near the roof peak or upper walls), while drafts originate from low openings, gaps in siding, or poorly sealed doors and windows at chicken height.
Control: Ventilation can be adjusted with covers, shutters, or hardware cloth that you open or close based on weather conditions. Drafts are accidental and uncontrolled, coming from construction flaws or damage.
Effect on chickens: Proper ventilation keeps birds healthy by maintaining dry bedding and fresh air without chilling them. Drafts blow cold air directly on roosting chickens, causing stress, illness, and reduced egg production.
Think of it this way: ventilation is like opening a window at the top of your bedroom on a stuffy night, while a draft is like sleeping next to a broken window that blows cold air on your pillow all night.
How Much Ventilation Does a Chicken Coop Need?
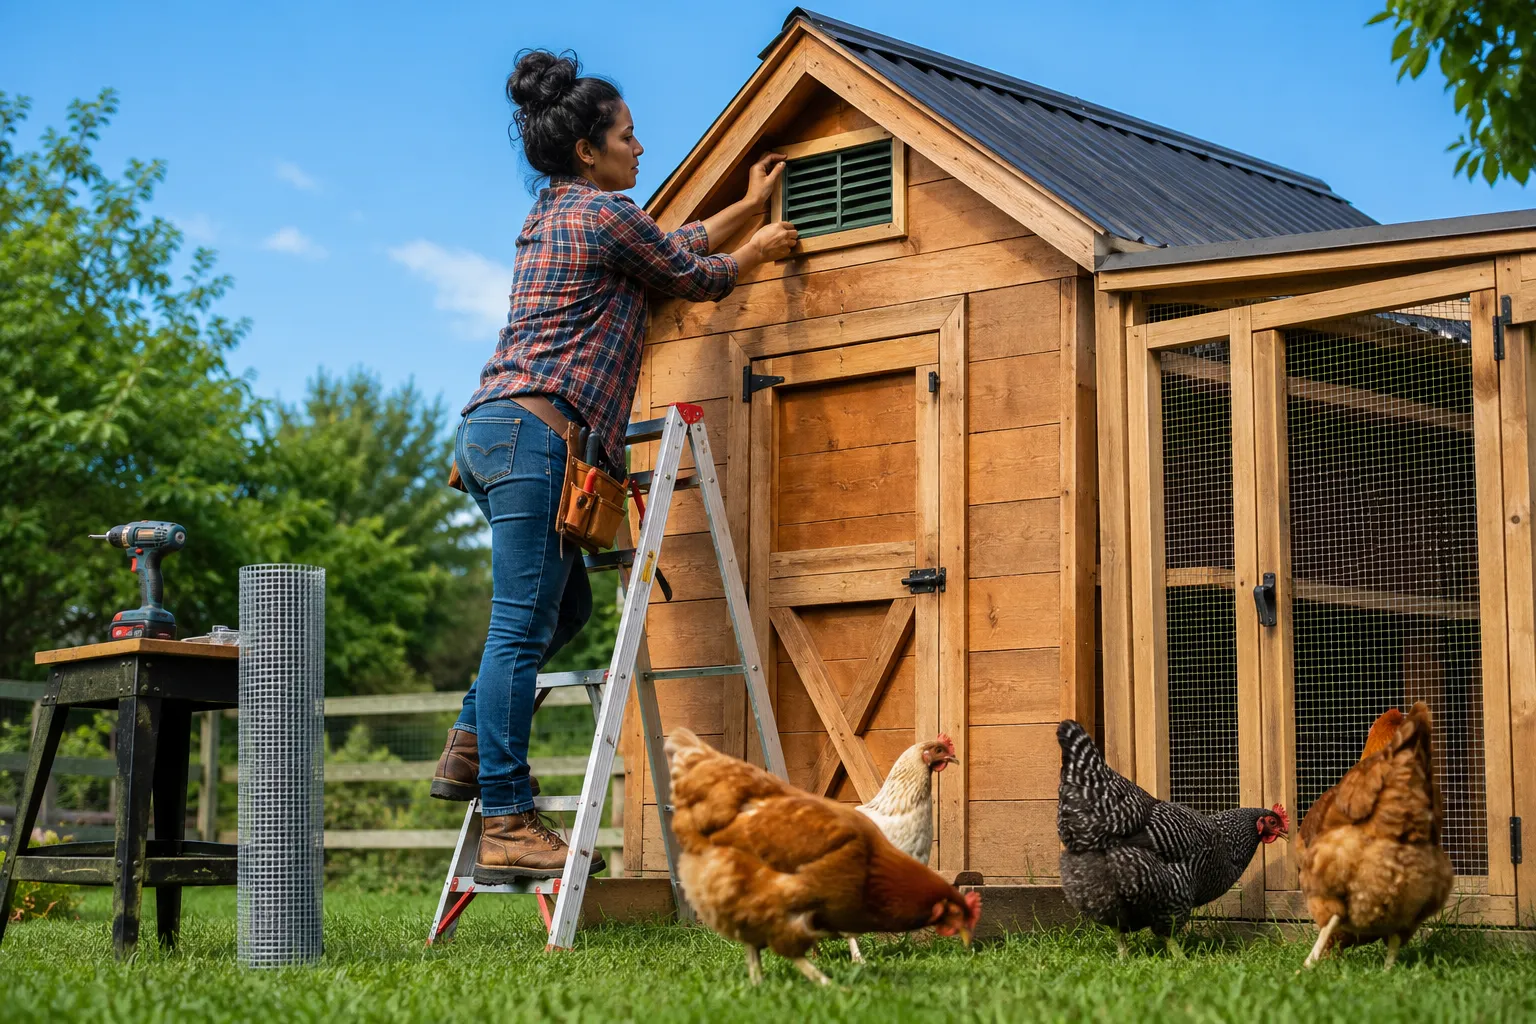
A chicken coop needs approximately one square foot of ventilation opening for every 10 square feet of floor space, with at least 20% of that ventilation positioned to allow cross-flow air movement. For a standard 4×8 foot coop (32 square feet), that means roughly 3-4 square feet of ventilation openings.
Minimum ventilation guidelines:
- Small coops (under 40 sq ft): 3-5 square feet of ventilation
- Medium coops (40-80 sq ft): 5-10 square feet of ventilation
- Large coops (over 80 sq ft): 10+ square feet of ventilation
- Hot, humid climates: Increase by 50% for better moisture removal
- Cold, dry climates: Can use minimum amounts with adjustable covers
Important factors that increase ventilation needs:
- More chickens in the same space (each bird produces moisture and heat)
- Deep litter bedding systems (generate more ammonia)
- High humidity climates (moisture removal becomes critical)
- Poor drainage around the coop (increases interior moisture)
A common mistake is thinking small coops need less ventilation per square foot. Actually, smaller coops with multiple chickens often need proportionally more ventilation because the air volume is limited and moisture builds up faster.
Choose adjustable ventilation so you can increase airflow in summer and reduce it slightly in extreme cold, but never block it completely.
What Happens If My Chicken Coop Has Too Many Drafts?
Chickens exposed to drafts experience cold stress, respiratory infections, frostbite on combs and wattles, reduced egg production, and increased susceptibility to disease. Drafts are particularly dangerous at night when chickens are roosting and their body temperature naturally drops.
Specific health problems caused by drafts:
- Respiratory infections: Cold air blowing on chickens weakens their immune system and allows bacteria and viruses to take hold
- Frostbite: Moisture from breathing combined with cold drafts freezes combs, wattles, and toes even when the coop temperature stays above freezing
- Stress behaviors: Chickens huddle excessively, fight over warm spots, and show reduced activity
- Egg production drops: Hens under cold stress redirect energy from laying to staying warm
- Wet bedding: Drafts don’t remove moisture effectively because they blow across chickens rather than pulling humid air up and out
How to identify draft damage:
Look for chickens that consistently roost in one corner (avoiding the drafty area), birds with ruffled feathers at night, or hens that seem reluctant to enter the coop at dusk. Black or purple discoloration on comb tips indicates frostbite from draft exposure.
The worst scenario is a coop with drafts but inadequate high ventilation. This combination traps moisture at chicken level while blowing cold air on birds, creating the perfect conditions for respiratory disease.
Where Should Ventilation Holes Be Placed in a Coop?
Ventilation openings should be placed at least 12 inches above roost height, ideally near the roof peak or along the upper portion of walls, with openings on at least two opposite walls to create cross-flow ventilation. The highest point of the coop should have an exhaust vent to allow warm, moist air to escape naturally.
Optimal ventilation placement strategy:
Upper wall vents (primary):
- Position 6-12 inches below the roof line
- Place on opposite walls for cross-ventilation
- Cover with hardware cloth to prevent predators
- Make them adjustable with sliding covers or shutters
Ridge or gable vents (secondary):
- Install at the roof peak for maximum moisture removal
- These work passively as warm air rises
- Can be simple triangular openings or purchased cupolas
- Should remain open year-round in most climates
Soffit vents (intake, optional):
- Low openings under roof overhangs bring fresh air in
- Only work if paired with high exhaust vents
- Must be protected from rain and predators
What to avoid:
- Vents at floor level (these create drafts, not ventilation)
- Openings directly above roosts (cold air sinks onto sleeping birds)
- Single-wall ventilation without cross-flow (air stagnates)
- Vents facing prevailing winter winds without adjustable covers
For a standard gable-roof coop, place hardware cloth-covered openings along both long walls near the roof peak, plus a small gable vent at each end. This creates excellent cross-ventilation without any drafts at roost level.
Can Chickens Get Sick from Drafts in Winter?
Yes, chickens are highly susceptible to respiratory infections, frostbite, and stress-related illnesses from winter drafts because cold air blowing directly on them prevents their feathers from insulating properly and exposes moist tissues (combs, wattles, respiratory tract) to freezing temperatures. Winter drafts are more dangerous than summer drafts because the temperature differential is greater and chickens spend more time roosting indoors.
Winter-specific draft problems:
Frostbite mechanism: Chickens breathe out warm, moist air that condenses on their combs and wattles. When a draft blows across this moisture in freezing temperatures, tissue freezes even if the ambient coop temperature is above 32°F.
Respiratory vulnerability: Cold, dry air from drafts irritates chickens’ respiratory tracts, reducing their natural defenses against bacteria like Mycoplasma gallisepticum and viruses like infectious bronchitis.
Energy drain: Birds exposed to drafts burn significantly more calories staying warm, leading to weight loss and reduced egg production even with adequate feed.
Moisture trap paradox: Many chicken keepers seal up coops to prevent drafts but also block ventilation, trapping moisture that makes the cold feel worse and promotes disease.
The right winter approach:
Seal all gaps and cracks at chicken level (below and at roost height) to eliminate drafts, but keep or even increase high ventilation openings to remove moisture. A cold, dry coop with good ventilation is far healthier than a slightly warmer coop with drafts and trapped moisture.
Chickens can comfortably handle temperatures well below freezing if they’re dry, out of the wind, and have adequate roost space. They cannot handle being wet and drafty, even at 40°F.

How Do I Add Ventilation Without Creating Drafts?
Add ventilation by cutting openings in the upper walls or gables at least 12 inches above roost height, covering them with hardware cloth for predator protection, and installing adjustable covers that let you control airflow without allowing direct air currents to reach roosting chickens. The key is maintaining separation between where air enters/exits and where chickens sleep.
Step-by-step ventilation installation:
- Measure roost height: Determine where your chickens sleep at night
- Mark vent locations: Choose spots at least 12 inches above roosts, preferably 18-24 inches
- Size your openings: Calculate 1 square foot per 10 square feet of floor space
- Cut openings: Use a saw to create rectangular or circular openings in upper walls
- Install hardware cloth: Attach 1/4-inch or 1/2-inch hardware cloth with screws and washers (not staples, which predators can pull out)
- Add adjustable covers: Build sliding panels or hinged shutters that let you partially close vents in extreme weather
- Test for drafts: On a cold, windy night, hold your hand at roost level to feel for air currents
Ventilation options that prevent drafts:
- Gable vents: Triangular openings at roof ends, far above chickens
- Soffit and ridge vent combination: Air enters low under eaves, exits at peak, never crosses roost level
- Cupolas: Decorative roof structures that provide excellent passive ventilation
- Upper wall slots: Long, narrow openings along the top of walls, easily covered with sliding panels
Common mistake to avoid: Don’t install windows at chicken level and call it ventilation. Windows belong high or should remain closed at night to prevent drafts. Ventilation openings are separate from windows and should be covered with hardware cloth, not glass.
If you’re retrofitting an existing coop, start with one or two small high vents and gradually increase ventilation area while monitoring for condensation and ammonia smell. It’s easier to add more ventilation than to fix a coop that’s too drafty.
What Are the Signs My Chicken Coop Has Poor Ventilation?
Poor ventilation shows up as condensation on walls and windows, strong ammonia smell, respiratory symptoms in chickens (sneezing, wheezing, nasal discharge), frostbitten combs in winter despite moderate temperatures, and consistently wet bedding even with regular cleaning. These signs indicate trapped moisture and poor air quality.
Visual and sensory indicators:
- Condensation or frost on interior walls: Moisture from chicken respiration has nowhere to escape
- Ammonia smell when you open the coop: Your nose should tell you immediately; if it stings, ventilation is inadequate
- Cobwebs covered in dust: Stagnant air allows dust to accumulate rather than being carried out
- Mold or mildew on wood surfaces: Chronic moisture problem from poor air exchange
- Windows fog up quickly: Humidity level is too high
Chicken health indicators:
- Respiratory sounds: Sneezing, coughing, wheezing, or gurgling sounds when chickens breathe
- Nasal discharge: Clear or cloudy discharge from nostrils
- Eye irritation: Watery eyes or swollen eyelids from ammonia exposure
- Frostbite in moderate cold: Combs and wattles turn black or purple even when temperatures stay above 20°F
- Reduced activity: Chickens seem lethargic or reluctant to spend time in the coop
Bedding and environment clues:
- Bedding stays damp despite regular additions of fresh material
- Droppings don’t dry out normally
- Dust hangs in the air rather than settling
- Temperature inside feels stuffy or “close” compared to outside
The morning test: Open your coop first thing in the morning after chickens have been roosting all night. If you’re hit with a strong ammonia smell or see condensation on walls, your ventilation is insufficient. A well-ventilated coop smells fresh even after a closed night.
Do I Need Ventilation in Winter or Just Summer?
Chickens need ventilation year-round, but winter ventilation is actually more critical than summer ventilation because each chicken exhales about a cup of moisture per night, and trapped moisture in cold weather causes frostbite and respiratory disease more readily than heat stress occurs in summer. Never close off ventilation completely in winter.
Why winter ventilation matters more:
Moisture production: A chicken’s body temperature is around 106°F. When they breathe in a closed coop on a cold night, that warm, moist breath condenses on every cold surface, including their own combs and wattles.
Frostbite risk: Frostbite happens when moisture meets cold, not from cold alone. A well-ventilated coop at 10°F is safer than a poorly ventilated coop at 30°F because the dry air prevents moisture from freezing on chicken tissues.
Ammonia concentration: Droppings produce ammonia constantly. In winter, when chickens spend more time inside and the coop is closed up, ammonia builds to harmful levels without adequate ventilation.
Disease prevention: Respiratory diseases spread faster in closed, moist environments. Good winter ventilation reduces pathogen concentration in the air.
Summer vs. winter ventilation strategy:
Summer approach:
- Open all adjustable vents fully
- Add temporary openings if needed for extreme heat
- Focus on cross-ventilation to create cooling breezes
- Consider adding fans in very hot climates (above 95°F regularly)
Winter approach:
- Keep high vents open (at least 50% of summer ventilation area)
- Close or reduce vents that face prevailing winter winds
- Seal all drafts at chicken level
- Monitor for condensation and adjust if moisture appears
The goal in winter is fresh, dry air without drafts. Your chickens’ feathers provide excellent insulation against cold, but they can’t protect against moisture or direct wind.
What Are Common Mistakes When Ventilating a Chicken Coop?
The most common ventilation mistakes are placing vents too low (creating drafts instead of ventilation), closing all vents in winter out of fear chickens will get cold, providing ventilation on only one wall (preventing air circulation), and confusing windows with ventilation openings. These errors lead to respiratory disease, frostbite, and poor flock health.
Top ventilation errors and fixes:
Mistake 1: Low ventilation openings
- Problem: Vents at or below roost height blow cold air on chickens
- Fix: Move all ventilation to at least 12 inches above roosts; seal low openings
Mistake 2: Closing vents in winter
- Problem: Traps moisture, leading to frostbite and respiratory disease
- Fix: Keep high vents open year-round; only adjust (don’t close) in extreme weather
Mistake 3: Single-wall ventilation
- Problem: Air enters but has no exit path, creating stagnant pockets
- Fix: Install vents on at least two walls to create cross-flow
Mistake 4: Confusing windows with ventilation
- Problem: Windows at chicken level create drafts when open, no airflow when closed
- Fix: Keep windows closed at night; add separate high vents for 24/7 airflow
Mistake 5: Undersizing ventilation
- Problem: Not enough air exchange to remove moisture and ammonia
- Fix: Calculate 1 sq ft of vent per 10 sq ft of floor space; increase in humid climates
Mistake 6: No predator protection
- Problem: Ventilation openings become entry points for raccoons, rats, weasels
- Fix: Cover all vents with 1/4-inch or 1/2-inch hardware cloth, securely fastened
Mistake 7: Fixed, non-adjustable vents
- Problem: Can’t adapt to extreme weather conditions
- Fix: Add sliding covers or hinged shutters to at least some vents
Mistake 8: Ignoring prevailing winds
- Problem: Winter winds blow directly through vents, creating drafts
- Fix: Place primary vents on walls sheltered from winter winds, or add adjustable covers
The biggest conceptual mistake is thinking chickens need warmth more than they need dry, fresh air. In reality, chickens handle cold extremely well but suffer quickly in damp, poorly ventilated conditions.
How to Tell If My Coop Has Drafts vs Good Airflow
Test for drafts by holding your hand at roost level on a windy evening; if you feel air movement where chickens sleep, you have drafts. Good airflow, in contrast, occurs above the chickens and creates gentle air circulation you can detect by holding a tissue near high vents, but produces no direct air current at roost height.
Practical draft detection methods:
The hand test (most reliable):
- Wait for a breezy or windy day
- Enter the coop and close the door
- Hold your hand at various heights, starting at roost level
- Move slowly around the entire coop perimeter
- Any air movement at or below roost height indicates a draft
- Air movement only at upper levels indicates good ventilation
The tissue test:
- Hang lightweight tissue strips at different heights
- Tissues at roost level should hang still or move very gently
- Tissues near upper vents should flutter, showing active air exchange
The smoke test (for serious draft hunting):
- Use a non-toxic smoke source (incense or smoke pen)
- Release smoke at various points in the coop
- Watch where it travels
- Smoke should rise and exit through high vents
- If smoke gets pulled horizontally across roosts, you have drafts
The overnight observation:
- Spend time in the coop after dark when chickens are roosting
- Note if chickens cluster in one area (avoiding drafty spots)
- Check if any birds have fluffed feathers or seem uncomfortable
- Well-ventilated coops have evenly distributed, relaxed chickens
Seasonal differences:
In summer, gentle air movement at roost level is acceptable and even beneficial for cooling. In winter, any detectable air current at roost level is a problem. Adjust your standards based on temperature and wind conditions.
Good airflow feels fresh when you enter the coop but doesn’t create a breeze you can feel on your skin at chicken level. Drafts feel like standing near an open door on a windy day.
What Are the Best Ventilation Options for Small Backyard Coops?
Small backyard coops (under 40 square feet) work best with simple gable vents at each end of the roof, hardware cloth-covered openings along the upper portion of walls, or a combination of soffit vents for intake and ridge vents for exhaust. These passive systems require no electricity, work in all weather, and are easy to retrofit into existing coops.
Top ventilation solutions for small coops:
Option 1: Gable vents (easiest)
- Cut triangular openings in each gable end
- Cover with hardware cloth
- Provides 1-3 square feet of ventilation depending on roof pitch
- Works passively as warm air rises and exits
- Best for: Simple A-frame or gable-roof coops
Option 2: Upper wall slots
- Cut 4-6 inch tall slots along the top of long walls
- Install sliding covers for adjustability
- Provides excellent cross-ventilation
- Easy to retrofit into existing coops
- Best for: Coops with vertical walls and flat or shed roofs
Option 3: Soffit and ridge combination
- Install vented soffit material under roof overhangs
- Add a ridge vent or cupola at the roof peak
- Creates natural convection flow
- Provides continuous ventilation
- Best for: New construction or major renovations
Option 4: Adjustable cupola
- Purchase or build a decorative cupola with louvers
- Mount at roof peak
- Provides 1-2 square feet of ventilation
- Adds visual appeal
- Best for: Coops where aesthetics matter
Option 5: PVC vent pipes
- Install 3-4 inch PVC pipes through the roof or upper walls
- Angle slightly downward inside to prevent rain entry
- Cover exterior opening with hardware cloth
- Cheap and easy to install
- Best for: Quick retrofits or temporary solutions
Sizing for small coops:
- 4×4 coop (16 sq ft): 2-3 square feet of ventilation
- 4×6 coop (24 sq ft): 3-4 square feet of ventilation
- 4×8 coop (32 sq ft): 4-5 square feet of ventilation
Small coops actually need proportionally more ventilation per square foot because the air volume is limited and moisture concentrates quickly. Don’t make the mistake of thinking “small coop = small vents.”
Can Too Much Ventilation Be Bad for Chickens?
Too much ventilation is rarely a problem in practice because chickens tolerate cold, moving air far better than stagnant, moist air, but excessive ventilation in extreme cold (below 0°F) combined with high winds can create drafts even from high openings, and in very hot, humid climates, too much ventilation without shade can bring in more heat than it removes. The solution is adjustable vents, not permanently undersized ventilation.
When ventilation becomes excessive:
Extreme cold with high winds:
- Winds above 20 mph can force cold air down through high vents
- Chickens may show signs of cold stress (huddling, reduced activity)
- Solution: Partially close vents facing prevailing winds, but keep leeward vents open
Desert heat with low humidity:
- Excessive airflow in 100°F+ temperatures can bring hot air in faster than chickens can cool
- Solution: Provide shade over the coop, use ventilation for night cooling, consider evaporative cooling
Very small coops in harsh climates:
- Tiny coops (under 16 sq ft) with large vents can lose heat too quickly
- Solution: Make vents adjustable so you can reduce (not eliminate) airflow in extreme weather
The reality check:
In 20+ years of collective chicken-keeping experience, problems from too much ventilation are extremely rare compared to problems from too little ventilation. Most chicken keepers who think they have “too much ventilation” actually have drafts (low openings) combined with adequate high ventilation.
Signs you might need to reduce ventilation:
- Chickens consistently roost as far from vents as possible, even in summer
- Bedding blows around the coop from air currents
- Snow or rain enters through vents and reaches roosting areas
- Temperature inside the coop equals outside temperature even with multiple chickens (some heat retention is normal)
The adjustable solution:
Instead of building minimal ventilation, build generous ventilation with adjustable covers. This lets you optimize for your specific climate and weather conditions. You can always close a vent temporarily, but you can’t easily add ventilation to a finished coop.
How to Winterize Coop Ventilation Without Blocking Airflow
Winterize coop ventilation by sealing all gaps and cracks at or below roost height to eliminate drafts while keeping high ventilation openings at least 50% open, adding adjustable covers to vents facing prevailing winter winds, and ensuring the coop remains dry rather than warm. The goal is draft-free fresh air, not a sealed, heated space.
Step-by-step winterization process:
Step 1: Seal low-level drafts (October-November)
- Inspect the entire coop at chicken level
- Use caulk, expanding foam, or wood strips to seal cracks in walls
- Weather-strip doors and pop doors
- Seal gaps where walls meet the floor
- Check for holes where predators might enter
Step 2: Verify high ventilation is adequate
- Calculate total ventilation area (should be 1 sq ft per 10 sq ft floor space minimum)
- Ensure vents are at least 12 inches above roosts
- Confirm vents on at least two walls for cross-flow
- If ventilation is inadequate, add more before winter arrives
Step 3: Add adjustable vent covers
- Build or purchase sliding panels for vents facing winter winds
- Use clear plastic, plywood, or rigid foam insulation
- Attach with hinges or sliding tracks
- Leave vents on sheltered walls fully open
Step 4: Test and monitor
- On a cold night (below 32°F), check for condensation in the morning
- Smell for ammonia when you open the coop
- Observe chicken behavior (huddling might indicate drafts)
- Adjust vent covers as needed
Winter ventilation rules:
- Never close all vents, even in extreme cold
- Keep at least 50% of summer ventilation area open in winter
- Prioritize moisture removal over heat retention
- Add bedding depth rather than reducing ventilation if chickens seem cold
What not to do:
- Don’t add heat lamps (fire hazard and prevents cold acclimation)
- Don’t cover vents with solid materials that prevent all airflow
- Don’t use plastic sheeting that traps moisture
- Don’t assume chickens need the same comfort level as humans
A properly winterized coop feels cold but dry when you enter, smells fresh, and has no condensation on walls. Chickens should be active and alert, not huddled and lethargic.
Do Different Climates Need Different Coop Ventilation?
Different climates require adjusted ventilation strategies, but the core principle remains the same: high openings for air exchange, no drafts at chicken level, and year-round ventilation. Hot, humid climates need maximum ventilation (up to 1.5 sq ft per 10 sq ft floor space), cold climates need adjustable ventilation to manage extreme weather, and arid climates need shade combined with ventilation.
Climate-specific ventilation strategies:
Hot, humid climates (Southeast US, Gulf Coast, tropics):
- Increase ventilation to 1.5 sq ft per 10 sq ft floor space
- Add multiple wall vents for maximum cross-breeze
- Consider solar-powered exhaust fans for extreme heat
- Elevate coop off ground for airflow underneath
- Use light-colored roofing to reflect heat
- Ventilation is critical year-round with no seasonal reduction
Cold, dry climates (Northern US, Canada, high altitude):
- Use standard ventilation ratios (1 sq ft per 10 sq ft)
- Make all vents adjustable for extreme cold snaps
- Position vents away from prevailing winter winds
- Insulate walls and roof (but not at the expense of ventilation)
- Deep litter method helps generate warmth
- Keep vents at least 50% open even in winter
Hot, dry climates (Southwest US, desert regions):
- Standard to increased ventilation (1-1.5 sq ft per 10 sq ft)
- Provide substantial shade over the coop
- Orient vents to catch prevailing breezes
- Consider evaporative cooling (misting) in extreme heat
- Maximize night ventilation when temperatures drop
- Protect from dust storms with removable covers
Moderate climates (Pacific Northwest, coastal regions):
- Standard ventilation ratios work well
- Focus on moisture removal due to high humidity
- Adjustable vents help manage variable weather
- Ensure good drainage around coop
- May need more ventilation than expected due to rain and humidity
Universal principles across all climates:
- Ventilation openings always go high (above roost level)
- Drafts at chicken level are always harmful
- Moisture removal is always the primary goal
- Chickens adapt to temperature extremes better than humans expect
- Adjustability is valuable in all climates for extreme weather events
Climate-specific mistakes:
- Cold climate keepers often over-seal coops, trapping moisture
- Hot climate keepers sometimes create drafts trying to cool chickens
- Humid climate keepers may underestimate ventilation needs
- Dry climate keepers might neglect shade while focusing on airflow
Observe your specific conditions: if you see condensation, smell ammonia, or notice respiratory issues, increase ventilation regardless of climate. The chickens will tell you what they need.
Frequently Asked Questions
How can I tell if my coop ventilation is working properly?
Your coop ventilation is working if there’s no condensation on walls in the morning, no ammonia smell when you open the door, bedding stays relatively dry between cleanings, and chickens show no respiratory symptoms. A well-ventilated coop smells fresh and feels dry, even after a closed night.
Can I use windows for coop ventilation?
Windows can supplement ventilation but shouldn’t be your primary ventilation system because they’re typically at chicken level (creating drafts when open) and get closed at night for security. Install dedicated high vents that stay open 24/7, and use windows for additional summer airflow if desired.
Do I need ventilation if I only have 2-3 chickens?
Yes, even small flocks need proper ventilation because each chicken produces about a cup of moisture per night through respiration and droppings. A tiny coop with 2-3 chickens can actually have worse air quality than a larger coop because the air volume is so limited.
What’s the best material to cover ventilation openings?
Hardware cloth with 1/4-inch or 1/2-inch openings is the best material because it allows excellent airflow while preventing predators (including weasels and mice) from entering. Chicken wire is not adequate for predator protection. Avoid solid screens that can clog with dust.
Should ventilation openings face a particular direction?
Place primary ventilation openings on walls sheltered from prevailing winter winds, with secondary openings on opposite walls for cross-ventilation. In hot climates, orient vents to catch cooling breezes. Avoid placing vents where rain or snow will blow directly in.
How do I add ventilation to a coop that’s already built?
Cut openings in the upper walls or gables using a saw, cover them with hardware cloth secured with screws and washers, and add adjustable covers if desired. Start with smaller openings and expand if needed. It’s easier to make vents larger than to patch them if you overdo it.
Is it normal for my coop to be cold in winter?
Yes, a cold coop is normal and healthy. Chickens handle cold extremely well as long as they’re dry and out of drafts. A coop that stays significantly warmer than outside temperature likely has inadequate ventilation and trapped moisture, which is more dangerous than cold.
Can I use a fan for coop ventilation?
Fans can supplement natural ventilation in extreme heat (above 95°F) but shouldn’t replace passive ventilation openings. If you use a fan, position it to pull air out through high openings, not blow directly on chickens. Solar-powered exhaust fans work well in hot climates.
How often should I check my coop ventilation?
Check ventilation weekly by observing condensation, smelling for ammonia, and watching chicken behavior. Inspect physical vents monthly for blockages from cobwebs, dust, or debris. Adjust vent covers seasonally as weather changes, and after any major storm or temperature shift.
What if my chickens seem cold even with proper ventilation?
If chickens appear cold (huddling excessively, fluffed feathers during the day, reluctance to move) despite proper high ventilation, check for drafts at roost level, ensure adequate roost space (10-12 inches per bird), verify they have enough food (chickens generate heat by digesting), and add more bedding depth. Don’t reduce ventilation to warm the coop.
Do I need different ventilation for chicks vs adult chickens?
Chicks under 6 weeks old need warmth and should be brooded in a draft-free space with adequate ventilation above the brooder area. Once fully feathered, young chickens need the same ventilation as adults. Never brood chicks in a sealed container; they still need fresh air.
Can I have too much hardware cloth coverage on my vents?
No, hardware cloth doesn’t significantly restrict airflow. Cover all ventilation openings completely with hardware cloth for predator protection. The mesh openings are large enough to allow excellent air exchange while keeping out even small predators like weasels.
Conclusion
Understanding the difference between coop ventilation and drafts is essential for maintaining a healthy flock. Ventilation provides controlled, high-level airflow that removes moisture and ammonia while keeping chickens comfortable, whereas drafts are unwanted air currents at chicken level that cause cold stress and illness. The key is placement: ventilation openings belong at least 12 inches above roost height, while any gaps at or below roost level create harmful drafts.
Start by calculating your ventilation needs (approximately one square foot of opening per 10 square feet of floor space), then install openings in the upper walls or gables of your coop. Cover all openings with hardware cloth for predator protection and add adjustable covers so you can adapt to extreme weather. Seal any cracks or gaps at chicken level to eliminate drafts while keeping high ventilation open year-round.
Monitor your coop regularly for signs of poor ventilation: condensation on walls, ammonia smell, or respiratory issues in your flock. Remember that chickens handle cold temperatures remarkably well as long as they stay dry and draft-free. A cold, well-ventilated coop is far healthier than a warm, stuffy one.
Take action this week by inspecting your coop for both inadequate ventilation and unwanted drafts. Your chickens will reward you with better health, consistent egg production, and fewer respiratory problems throughout the year.


